


# Video Management
# Video data collection management
# Set the type of camera to turn on
Before video capture settings, you can get the camera list, current camera, and default camera through the properties and methods in the JCMediaDevice class, as follows:
std::list<JCMediaDeviceCamera>* cameras = JCManager::shared()->mediaDevice->getCameras();
After obtaining the Camera list, call the switchCamera (opens new window) method to switch the specified camera:
/// Switch the specified camera
JCManager::shared()->mediaDevice->switchCamera(cameras[0]);
# Set camera capture resolution
Call the setCameraProperty (opens new window) interface to customize the capture parameters of the camera, such as the height, width and frame rate of the capture, to achieve different capture resolutions.
JCManager::shared()->mediaDevice->setCameraProperty(640, 360, 24);
# Set canvas rotation angle
Call the rotate (opens new window) interface to set the rotation angle of the canvas in the Canvas. Among them, the rotation angle must be a multiple of 90, which represents the angle after rotating with the screen in the positive direction.
JCManager::shared()->mediaDeviceCanvas->rotate(Angle90);
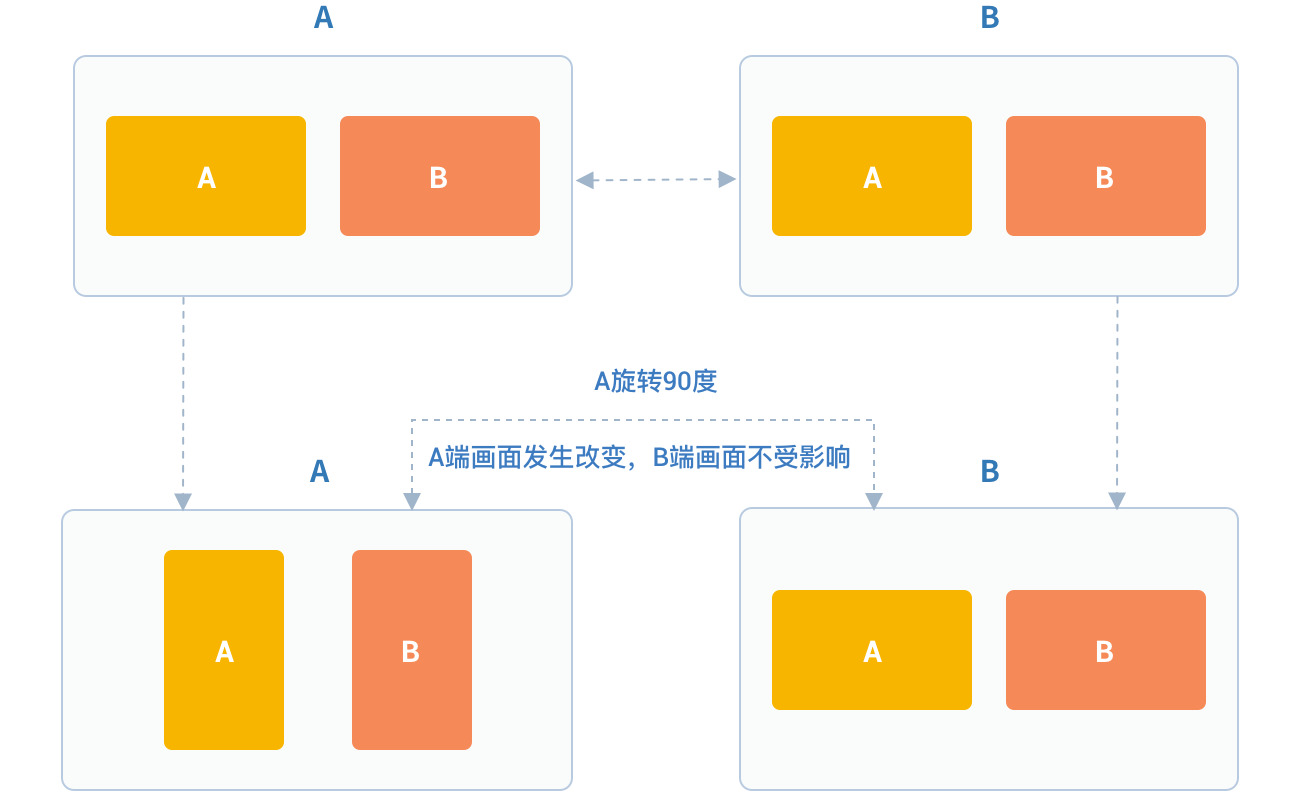
After calling this interface, the local video image and remote video image displayed on the local end will rotate at the same angle at the same time, and the image displayed on the receiver will not be affected.
For example, if A is set to rotate 90 degrees, the A and B video images displayed on the A side will rotate 90 degrees at the same time. The video image on the B side will not change. As shown below:
The angle reference is as follows:
// Window and screen angle 0
Angle0 = 0,
// Window and screen angle 90
Angle90 = 90,
// Window and screen angle 180
Angle180 = 180,
// Window and screen angle 270
Angle270 = 270
# Video data collection management
# Raw video data
In the process of video transmission, you can perform image processing on each frame of video data to achieve beauty mode and other needs. There are two processingcircumstances:
Process before pre-encoding and after video capture which affects local preview and peer receiving video.
Process after decoding and before rendering which affects the local video reception.
Details are as follows:
Process after video capture and before pre-coding
Refer to the following steps to implement the original video data function in your project:
Register the video capture callback through Zmf_VideoCaptureAddCallback before initiating the service, and implement a callback function of type ZmfVideoCaptureCallback in this function;
After successful registration, the JC SDK will call back the corresponding parameters of the original video data collected through the callback function when each video frame is captured;
After the user gets the video data, he/she performs parameter processing in the callback function according to the needs of the scene, and the processed data is returned to the JC SDK through the callback function.
Register the video capture callback at first, which can be called after successful login:
/** add capture data callback
 * @param[in] pUser     the callback user data
 * @param[in] pfnCb     the callback
 * returns 0 on succeed, otherwise failed
 */
int Zmf_VideoCaptureAddCallback (void *pUser, ZmfVideoCaptureCallback pfnCb)
Callback type description:
/** the callback to receive captured image
 * iImgAngle - iCamOrient equal to device rotate angle.
 * if encoder is NULL, the pixel format of buf must be ZmfPixelFormatI420
 *
 * @param[in] pUser     the user data registered by Zmf_VideoCaptureAddCallback
 * @param[in] captureId the id of captured image
 * @param[in] iFace     the capture Face @see ZmfVideoFaceType
 * @param[in] iImgAngle the image rotated angle (CW)
 * @param[in] iCaptureOrient the capturer fixed orient
 * @param[in,out] iWidth  the image width
 * @param[in,out] iHeight the image height
 * @param[in,out] buf     the image data I420 buffer
 * @param[in,out] encoder capture encoder
 */
 typedef void (*ZmfVideoCaptureCallback)(void* pUser, const char* captureId, int iFace,int iImgAngle, int iCaptureOrient, int* iWidth, int* iHeight,unsigned char *buf, ZmfVideoCaptureEncoder* encoder);
Sample code:
static void zmfVideoCaptureCallback(void* pUser, const char* captureId, int iFace,
                                    int iImgAngle, int iCaptureOrient, int* iWidth, int* iHeight,
                                    unsigned char *buf, ZmfVideoCaptureEncoder* encoder) {

    cout << "Video data processing" << endl;
}
void JCSampleDlg::OnBnClickedButtonCall()
{
    //Register callback
    Zmf_VideoCaptureAddCallback(void*pUser, zmfVideoCaptureCallback);
    //Initiate the call
    ...
}
After registration, the video data collected in each frame can be processed through the ZmfVideoCaptureCallback callback, and the corresponding video data can be processed.
If you want to remove the callback, call the following interface:
/** remove capture data callback
  * @param[in] pUser     the callback user data
  * returns 0 on succeed, otherwise failed
  */
int Zmf_VideoCaptureRemoveCallback (void *pUser)
Sample code:
void JCSampleDlg::OnBnClickedButtonEndCall()
{
    //Remove the callback
    Zmf_VideoCaptureRemoveCallback(p);
    //Hang up the call
    ...
}
Process after decoding and before pre-rendering
Refer to the following steps to implement the original video data function in your project:
Register the video capture callback through Zmf_VideoCaptureAddCallback before initiating the service, and implement a callback function of type ZmfVideoCaptureCallback in this function
After successful registration, the JC SDK will call back the corresponding parameters of the original video data collected through the callback function when each video frame is captured
After the user gets the video data, he/she performs parameter processing in the callback function according to the needs of the scene, and the processed data is returned to the JC SDK through the callback function.
Register the video capture callback at first, which can be called after successful login:
/**
 * add render data callback
 *
 * @param[in] pUser      the callback user data
 * @param[in] pfnCb      the callback
 *
 * @return               0 on succeed, otherwise failed.
 */
int Zmf_VideoRenderAddCallback (void *pUser, ZmfVideoRenderCallback pfnCb);
Callback type description:
/**
 * The callback to receive video render data
 *
 * @param[in] pUser         the user data registered by Zmf_AddVideoRenderCallback
 * @param[in] renderId      video render unique name
 * @param[in] sourceType    video render source type @see ZmfVideoSourceType
 * @param[in] iAngle the image angle
 * @param[in] iMirror the image mirror type
 * @param[in] iWidth  the image width
 * @param[in] iHeight  the image height
 * @param[in] buf           I420 render data
 *
 * @return                  if process render data should return > 0, other 0
 *
 * @remarks
 *  if buf == 0 or iWidth ==0 or iHeight == 0, means the render will close,
 *  so should call Zmf_OnVideoRenderRequestRemove.
 */
 typedef int  (*ZmfVideoRenderCallback)(void* pUser, const char* renderId, int sourceType, int iAngle,int iMirror, int* iWidth, int* iHeight, unsigned char *buf,unsigned long timeStamp);
After registration, the video data collected in each frame can be processed through the ZmfVideoCaptureCallback callback, and the corresponding video data can be processed.
Sample code:
static void zmfVideoRenderCallback(void* pUser, const char* renderId, int sourceType, int iAngle,
                                   int iMirror, int* iWidth, int* iHeight, unsigned char *buf,
                                   unsigned long timeStamp) {

   cout << "Video data processing" << endl;
}
void JCSampleDlg::OnBnClickedButtonCall()
{
    //Register callback
    Zmf_VideoRenderAddCallback(void*pUser, zmfVideoRenderCallback);
    //Initiate the call
    ...
}
If you want to remove the callback, call the following interface:
/**
 * remove render data callback
 *
 * @param[in] pUser      the callback user data
 * @return               0 on succeed, otherwise failed.
 */
int Zmf_VideoRenderRemoveCallback (void *pUser)
Sample code:
void JCSampleDlg::OnBnClickedButtonEndCall()
{
    //Remove the callback
    Zmf_VideoRenderRemoveCallback(p);
    //Hang up the call
    ...
}
# Custom video capture and rendering
For video capture/rendering devices that do not support the system’s standard APIs, or if you want to use the already collected I420 or h264 data, you can start a separate capture/rendering thread and put the capture/rendering data into the corresponding interface of Juphoon for subsequent operations.
Refer to the following steps to implement the custom video source function in your project:
Input the data collected/ready to be rendered by the external device to the JC SDK through the interface provided by the JC SDK for subsequent operations.
If you want to stop the data input collected/ready to be rendered by the external device, you can call the interface provided by the JC SDK to stop the data input.
The custom video capture interface is as follows:
After receiving the callback for successful login and after Zmf_VideoInitialize is initialized successfully, input the data collected/ready for rendering through the following interface
/**
 * The video capture data entry to ZMF
 * iImgAngle - iCamOrient equal to device rotate angle.
 * if encoder is NULL, the pixel format of bufI420 must be ZmfPixelFormatI420
 *
 * @param[in] captureId     unique name of the video capture           //Identify the external ID
 * @param[in] iFace         the capture face, @see ZmfVideoFaceType    //The orientation of the external video, generally 0
 * @param[in] iImgAngle     the image rotated angle (CW)               // The rotation angle required for the input external video to stand upright, clockwise is positive, and the value range is 0, 90, 180, 270
 * @param[in] iCamAngle     the camera fixed orient                    //External camera fixed angle, same as iImgAngle, value range 0, 90, 180, 270
 * @param[in,out] iWidth    the image width at least align 4,
 *                          return the cropped width of bufI420.       //Input the width of the image
 * @param[in,out] iHeight   the image height at least align 4.
 *                          return the cropped height of bufI420.      //Input the height of the input image
 * @param[in] bufI420       the image data                             //Input the buffer of the input image
 * @param[in,out] encoder   the capture encoder                        //Identify the encoding format of the input image
 */
 void Zmf_OnVideoCapture(const char *captureId, int iFace, int iImgAngle, int iCamAngle, int *iWidth, int *iHeight, unsigned char *bufI420, ZmfVideoCaptureEncoder* encoder);
Sample code:
Zmf_VideoInitialize(NULL);
void JCSampleDlg::OnBnClickedButtonCall()
{
    //The input resolution of the image is 640*360 with I420 code, without additional rotation
    Zmf_OnVideoCapture("Test",0,0,0,640,360,buf,0);
    //Initiate the call
    ...
}
Collection stop interface:
/**
 * tell ZMF the video capture has stopped
 *
 * @param[in] captureId     unique name of the device
 */
void Zmf_OnVideoCaptureDidStop(const char *captureId);
Sample code:
void JCSampleDlg::OnBnClickedButtonEndCall()
{
    //Stop collection
    Zmf_OnVideoCaptureDidStop("Test");
    //Hang up the call
    ...
}
If you want to use your own rendering method on the video rendering side, call the following interface:
Video data rendering interface:
/**
 * The video render data entry to ZMF
 *
 * @param[in] renderId      unique name of the video render source                //Identify the rendering ID
 * @param[in] sourceType    the render source type, @see ZmfVideoSourceType       //Render source type, generally 0
 * @param[in] iAngle        the image rotated angle (CW)ZmfVideoCaptureCallback   //The angle required for rendering upright, generally 0, value range 0, 90, 180, 270
 * @param[in] iMirror       the camera fixed orient                               //default 0
 * @param[in] iWidth        the image width                                       //Render image width
 * @param[in] iHeight       the image height                                      //Render image height
 * @param[in] bufI420       the image data I420 buffer                            //Renderibg data buffer
 */
 void Zmf_OnVideoRender(const char *renderId, int sourceType, int iAngle, int iMirror, int *iWidth, int *iHeight, unsigned char *bufI420, unsigned long timeStamp);
Sample code:
Zmf_VideoInitialize(NULL);
void JCSampleDlg::OnBnClickedButtonCall()
{
    //The input resolution of the image is 640*360 with I420 code, without additional rotation
    Zmf_OnVideoRender("Test",0,0,0,640,360,buf,0);
    //Initiate the call
    ...
}
Render data stop interface:
Zmf_OnVideoRender(const char *renderId, 0, 0, 0, 0, 0, 0, 0);
Sample code:
void JCSampleDlg::OnBnClickedButtonEndCall()
{
    //Stop rendering
    Zmf_OnVideoRender("Test", 0, 0, 0, 0, 0, 0, 0);
    //Hang up the call
    ...
}
# Video rendering management
Rendering management mainly uses the interfaces in the JCMediaDeviceVideoCanvas class, including Update video rendering logo, Pause rendering and Resume rendering.
# Update video rendering logo
Call replace (opens new window) interface to update video rendering logo:
JCManager::shared()->mediaDeviceCanvas->replace(videoSource);
# Pause rendering
Call the pause (opens new window) interface to pause the rendering of the image.
JCManager::shared()->mediaDeviceCanvas->pause();
# Resume rendering
Call the resume (opens new window) interface to resume the paused video rendering.
JCManager::shared()->mediaDeviceCanvas->resume();
# Video equipment management
Video device management mainly uses the methods in the JCMediaDevice class, as follows:
# Turn on/off the camera
Call the startCamera (opens new window) interface to start the camera.
Call stopCamera (opens new window) interface to turn off the camera.
//Start the camera
JCManager::shared()->mediaDevice->startCamera();
//Turn off the camera
JCManager::shared()->mediaDevice->stopCamera();
# Get the currently used camera
Call getCamera (opens new window) interface to get the currently used camera.
JCMediaDeviceCamera camera = JCManager::shared()->mediaDevice->getCamera();
# Get the window list
Call getWindows (opens new window) interface to get the window list.
std::list<JCMediaDeviceWindow>* windows = JCManager::shared()->mediaDevice->getWindows();
# Get teh desktop list
Call the getDesktops (opens new window) interface to get the desktop list.
std::list<JCMediaDeviceWindow>* windows = JCManager::shared()->mediaDevice->getDesktops();