


# 实现插件特性
本文展示如何实现菊风视频能力平台提供的插件功能。
# 前提条件
开始前,请确保你具备以下条件:
- 已下载插件包
- 已集成 Juphoon Plugin。目前只有该版本支持插件集成。
- 插件 API说明在页面底部,请查看。
# 1. 定制化配置
/**
 * @brief 设置定制配置参数
 * @param customConfig 定制化配置参数
 */
- (void)setCustomConfig:(JCCGuestCustomConfig *)customConfig;
JCCGuestCustomConfig (opens new window) 内部根据不同界面进行分类区分
/// 定制化配置参数
/// 初始化JCCGuestCustomConfig,内部会对JCCTalkingConfig也做初始化
@interface JCCGuestCustomConfig : NSObject
/// 呼叫页面配置
@property (nonatomic, strong) JCCWaitingConfig *waitingConfig;
/// 来电页面配置
@property (nonatomic, strong) JCCIncomingConfig *incomingConfig;
/// 聊天页面配置
@property (nonatomic, strong) JCCTalkingConfig *talkingConfig;

@end
# 呼叫页面配置
@interface JCCWaitingConfig : NSObject

/// 呼叫时,需要播放的音频文件路径,不传默认不播放音乐
@property (nonatomic, copy) NSString *waitingAudioPath;

// 设置tipTitle和tipContent会出现跑马灯提示
/// 跑马灯标题
@property (nonatomic, copy) NSString *tipTitle;
/// 跑马灯内容
@property (nonatomic, copy) NSString *tipContent;

@end
# 来电页面配置
/// 回呼场景:来电定制化配置参数
@interface JCCIncomingConfig : NSObject
/// 来电时,需要播放的音频文件路径,不传默认不播放音乐
@property (nonatomic, copy) NSString *incomingAudioPath;
/// 接听超时时长,默认60秒,以秒为单位
@property (nonatomic, assign) NSUInteger answerTimeout;
/// 是否使用自定义来电页面,默认为NO
@property (nonatomic, assign) BOOL useCustomIncomming;

@end
# 通话页面配置
// 底部工具栏按钮枚举定义
typedef NS_ENUM(NSUInteger, JCCToolBarButtons) {
    JCCEndButton = 1,          // 挂断按钮
    JCCSpeakerButton,          // 扬声器按钮
    JCCMicButton,              // 麦克风按钮
    JCCCameraButton,           // 摄像头按钮
    JCCFlipButton,             // 翻转按钮
    JCCScreenShareButton,      // 屏幕共享按钮
    JCCLocalRecordButton,      // 本地录制按钮
    JCCChatButton,             // 消息按钮
    JCCCollaborationButton,    // 协作按钮
    JCCRemoteRecordButton      // 远程录制按钮
};


@interface JCCTalkingConfig : NSObject

/// 颜色格式为8位16进制ARGB,例如0xFFFFFFFF

/// 顶部栏背景色
@property (nonatomic, assign) NSUInteger topBarBackground;
/// 标题内容
@property (nonatomic, copy) NSString *title;
/// 工具栏背景色
@property (nonatomic, assign) NSUInteger toolBarBackground;
/// JCToolbarButtons配置数组
@property (nonatomic, strong) NSArray *toolBarButtons;
/// 自定义图层,需实现IBaseView协议,用来接收生命周期等事件,尺寸为全屏幕大小
@property (nonatomic, strong) UIView<JCCIBaseView> *customView;
/// 是否显示最小化按钮,默认为NO
@property (nonatomic, assign) BOOL showMinimized;
/// 是否显示统计按钮,默认为NO
@property (nonatomic, assign) BOOL showStatistic;
/// 是否使用第三方排队机,如果为NO,则使用插件中排队机,默认为NO
@property (nonatomic, assign) BOOL useThirdACD;
/// 是否显示电子签名栏取消按钮,默认为NO
@property (nonatomic, assign) BOOL showCancelSign;
/// 电子签名画笔宽度,默认为8
@property (nonatomic, assign) NSUInteger defaultDoodleStrokeWidth;
/// 签字签名是否全屏显示
@property (nonatomic, assign) BOOL signFullScreen;
/// 通话保持中时,需要播放的音频文件路径
@property (nonatomic, copy) NSString *heldAudioPath;
/// 转接时,需要播放的音频文件路径
@property (nonatomic, copy) NSString *transferAudioPath;
/// 是否显示共享的画面,默认为YES
@property (nonatomic, assign) BOOL showShareCanvas;
/// 协作共享远端路径颜色
@property (nonatomic, assign) NSUInteger collaborationRemotePathColor;
/// 协作共享自己端路径颜色
@property (nonatomic, assign) NSUInteger collaborationSelfPathColor;
/// 通话中关闭摄像头视频背景颜色,如果不使用背景颜色则设置为-1,默认设置为-1
@property (nonatomic, assign) NSInteger videoHoldBackgroundColor;
/// 通话中关闭摄像头小视频图标
@property (nonatomic, strong) UIImage *videoHoldSmallIcon;
/// 通话中关闭摄像头大视频图标
@property (nonatomic, strong) UIImage *videoHoldLargeIcon;
/// 全显示功能布局
@property (nonatomic, assign) BOOL fullDisplayFunctionLayout;

@end
// IBaseView定义
@protocol IBaseView <NSObject>

- (void)viewDidLoad;

- (void)viewWillAppear:(BOOL)animated;

- (void)viewDidAppear:(BOOL)animated;

- (void)viewWillDisappear:(BOOL)animated;

- (void)viewDidDisappear:(BOOL)animated;

@end
# 示例代码
JCCGuestCustomConfig *customConfig = [[JCCGuestCustomConfig alloc] init];
customConfig.talkingConfig.toolBarButtons = @[@(JCCEndButton), @(JCCSpeakerButton)];
...
[JCCGuestManager.shared setCustomConfig:customConfig];
# 2. 在通话页面中添加自定义视图
自定义图层需要实现IBaseView协议
@interface TestCustomView : UIView<IBaseView>

@end

@implementation TestCustomView

- (void)viewDidAppear:(BOOL)animated {
    NSLog(@"viewDidAppear");
}

- (void)viewDidDisappear:(BOOL)animated {
    NSLog(@"viewDidDisappear");
}

- (void)viewDidLoad {
    NSLog(@"viewDidLoad");
}

- (void)viewWillAppear:(BOOL)animated {
    NSLog(@"viewWillAppear");
}

- (void)viewWillDisappear:(BOOL)animated {
    NSLog(@"viewWillDisappear");
}
示例代码:
///自定义图层尺寸设置为全屏大小
TestCustomView *customView = [[TestCustomView alloc] initWithFrame:bounds];
JCCManager.defaultManager.customConfig.talkingConfig.customView = customView;
# 3. 在通话过程中弹窗
可以通过 ViewController 、Window 以及插件提供的自定义视图实现弹窗。
# ViewController弹出方式
获取最顶层 ViewController ,通过顶层 ViewController present 弹窗 Controller
- (UIViewController *)topViewController {
    UIViewController *resultVC;
    resultVC = [self _topViewController:[[UIApplication sharedApplication].keyWindow rootViewController]];
    while (resultVC.presentedViewController) {
        resultVC = [self _topViewController:resultVC.presentedViewController];
    }
    return resultVC;
}

- (UIViewController *)_topViewController:(UIViewController *)vc {
    if ([vc isKindOfClass:[UINavigationController class]]) {
        return [self _topViewController:[(UINavigationController *)vc topViewController]];
    } else if ([vc isKindOfClass:[UITabBarController class]]) {
        return [self _topViewController:[(UITabBarController *)vc selectedViewController]];
    } else {
        return vc;
    }
    return nil;
}
TestViewController *controller = [TestViewController alloc] init];
[topViewController presentViewController:controller animated:YES completion:nil];
# Window方式
创建一个 Window,通过 Window 弹出弹窗。需要保证 Window 的生命周期。可以设置 Window 为单例或者让某个类持有 Window ,在使用结束再销毁 Window 。
UIWindow *window = [[UIWindow alloc] initWithFrame:[UIScreen mainScreen].bounds];
window.rootViewController = [[UIViewController alloc] init];
window.windowLevel = UIWindowLevelNormal + 1;
window.hidden = NO;

TestViewController *controller = [TestViewController alloc] init];
[window.rootViewController presentViewController:controller animated:YES completion:nil];
如果实现了iOS 13的 **UIWindowSceneDelegate ,**需要将 Window 添加到 windowScene 中
if (@available(iOS 13.0, *)) {
    for (UIWindowScene *windowScene in [UIApplication sharedApplication].connectedScenes) {
        if (windowScene.activationState == UISceneActivationStateForegroundActive) {
            window.windowScene = windowScene;
            break;
        }
    }
}
# 自定义视图方式
在自定义视图中添加弹窗视图,需要显示的时候弹出,其他时候隐藏。
JCCGuestCustomConfig *customConfig = [[JCCGuestCustomConfig alloc] init];
// TestCustomView 实现了IBaseView协议
TestCustomView *customView = [[TestCustomView alloc] initWithFrame:self.view.bounds];
customConfig.talkingConfig.customView = customView;
[JCCGuestManager.shared setCustomConfig:customConfig];
# 4. 对接第三方排队机
使用第三方的排队机,需要在配置项中进行设置,屏蔽掉插件中提供的排队机。
# 定制化配置中设置使用第三方排队机
JCCGuestCustomConfig *customConfig = [[JCCGuestCustomConfig alloc] init];
customConfig.talkingConfig.useThirdACD = YES;
[JCCGuestManager.shared setCustomConfig:customConfig];
# 监听通话状态回调
呼叫状态时,调用第三方排队机界面
通话接通时,判断是否使用了第三方排队机,如果使用了第三方排队机,先隐藏第三方排队机界面,再调用showTalkingView 方法。
通话结束的时候,关闭第三方排队机界面。
JCCGuestCallState (opens new window) 判断通话状态。
- (void)onCallStateChanged:(JCCGuestCallState)state inviter:(JCCInviter *)inviter termReason:(JCCTermReason)reason
{
    self.callState = state;
    // 呼叫状态时
    if (state == JCCGuestCallStateCalling) {
        // 判断是否使用了第三方排队机
        if (self.customConfig.talkingConfig.useThirdACD) {
            self.testACDController = [[TestThirdACDViewController alloc] init];
            self.testACDController.modalPresentationStyle = UIModalPresentationOverFullScreen;
            [[UIApplication sharedApplication].keyWindow.rootViewController presentViewController:self.testACDController animated:YES completion:nil];
        }
    }
    // 通话接通时
    if (state == JCCGuestCallStateTalking) {
        // 判断是否使用了第三方排队机
        if (self.customConfig.talkingConfig.useThirdACD) {
            // 先隐藏第三方排队机界面,再调用showTalkingView,显示通话界面
            [self.testACDController dismissViewControllerAnimated:NO completion:^{
                self.testACDController = nil;
                [JCCGuestManager.shared showTalkingView:NO];
            }];
        }
    }
    // 通话挂断时
    else if (state == JCCGuestCallStateTermed) {
        [self.testACDController dismissViewControllerAnimated:NO completion:^{
            self.testACDController = nil;
        }];
    }
}
# 5. 使用签名
主动调用签名,签名图片会保存在设备中,签名成功,会将签名结果路径返回。
# 调起签名页
调用 showSignView (opens new window) 方法,主动调用签名。
// 调起签名页
[JCCGuestManager.shared showSignView];
# 获得签名结果
通过 onSignRequestComplete (opens new window) 接收签名结果。
// 签名结果回调
- (void)onSignRequestComplete:(BOOL)result filePath:(NSString *)filePath {
    if (result) {
        NSLog(@"签名成功, 签名存放路径 %@", filePath);
    } else {
        NSLog(@"签名失败");
    }
}
# 6. 开启国密
# 参数配置
开启国密需要在初始化的时候设置 JCCLoginParam (opens new window) 的 accountEntry 和 certificate 参数。
参数需要根据实际情况填写。
JCCLoginParam *config = [[JCCLoginParam alloc] init];

// 设置账户分录,测试环境accountEntry值
config.accountEntry = @"AccountEntry:sarc -h arc@AccountEntry -p 198 -S 3;";
// 设置证书路径,测试证书
NSString *s1 = [[NSBundle mainBundle] pathForResource:@"CA" ofType:@"der"];
NSData *data1 = [[NSFileManager defaultManager] contentsAtPath:s1];
NSString *ca = [data1 base64EncodedStringWithOptions:NSDataBase64EncodingEndLineWithLineFeed];
config.certificate = ca;

config.appKey = @"appkey";
config.server = @"server"
config.userName = @"userName"

[JCCGuestManager.shared login:config];
# 加载国密库
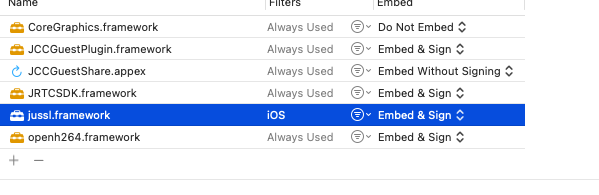
加载jussl.framework库。
# 7. 开启云加速
- 从管理平台申请加速云接入,并获得加速云接入地址,接口 key 和接入 key 密钥
- 登录参数中需要将上述获得的参数填入
JCCLoginParam *config = [[JCCLoginParam alloc] init];
...
config.server = @"加速云接入地址";
config.accelerateKey = @"加速云Key";
config.accelerateKeySecret = @"加速云Key密钥";
...
BOOL ret = [JCCGuestManager.shared login:config];
# 8. 屏幕共享
屏幕共享可以让您和频道中的其他成员一起分享设备里的精彩内容,您可以在频道中利用屏幕共享的功能进行文档演示、在线教育演示、视频会议以及游戏过程分享等。 通过ReplayKit 2的系统库,实现屏幕共享,该库仅支持iOS 11.0 以上的系统进行共享系统的屏幕,且支持屏幕外共享
# 添加 Broadcast Upload Extension扩展
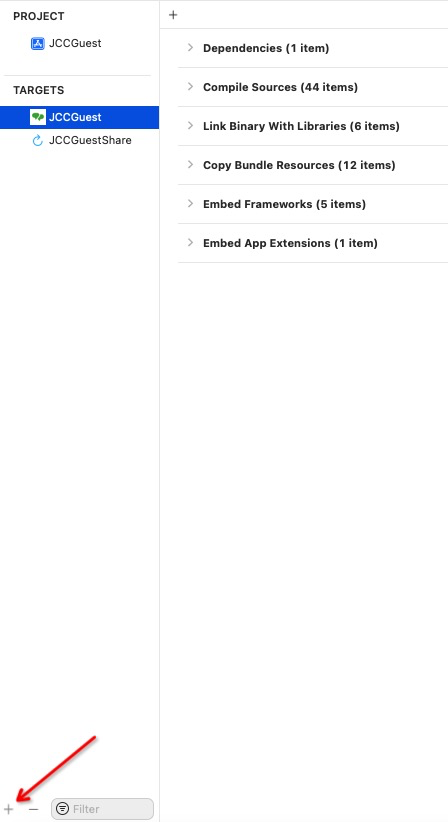
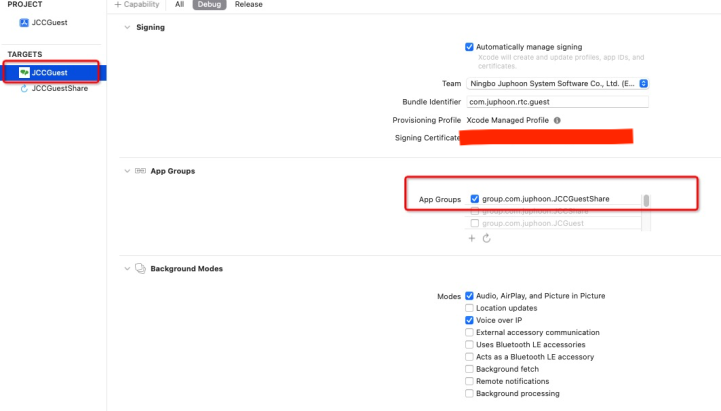
1、项目中选择target,添加 extension ,用于屏幕录制。
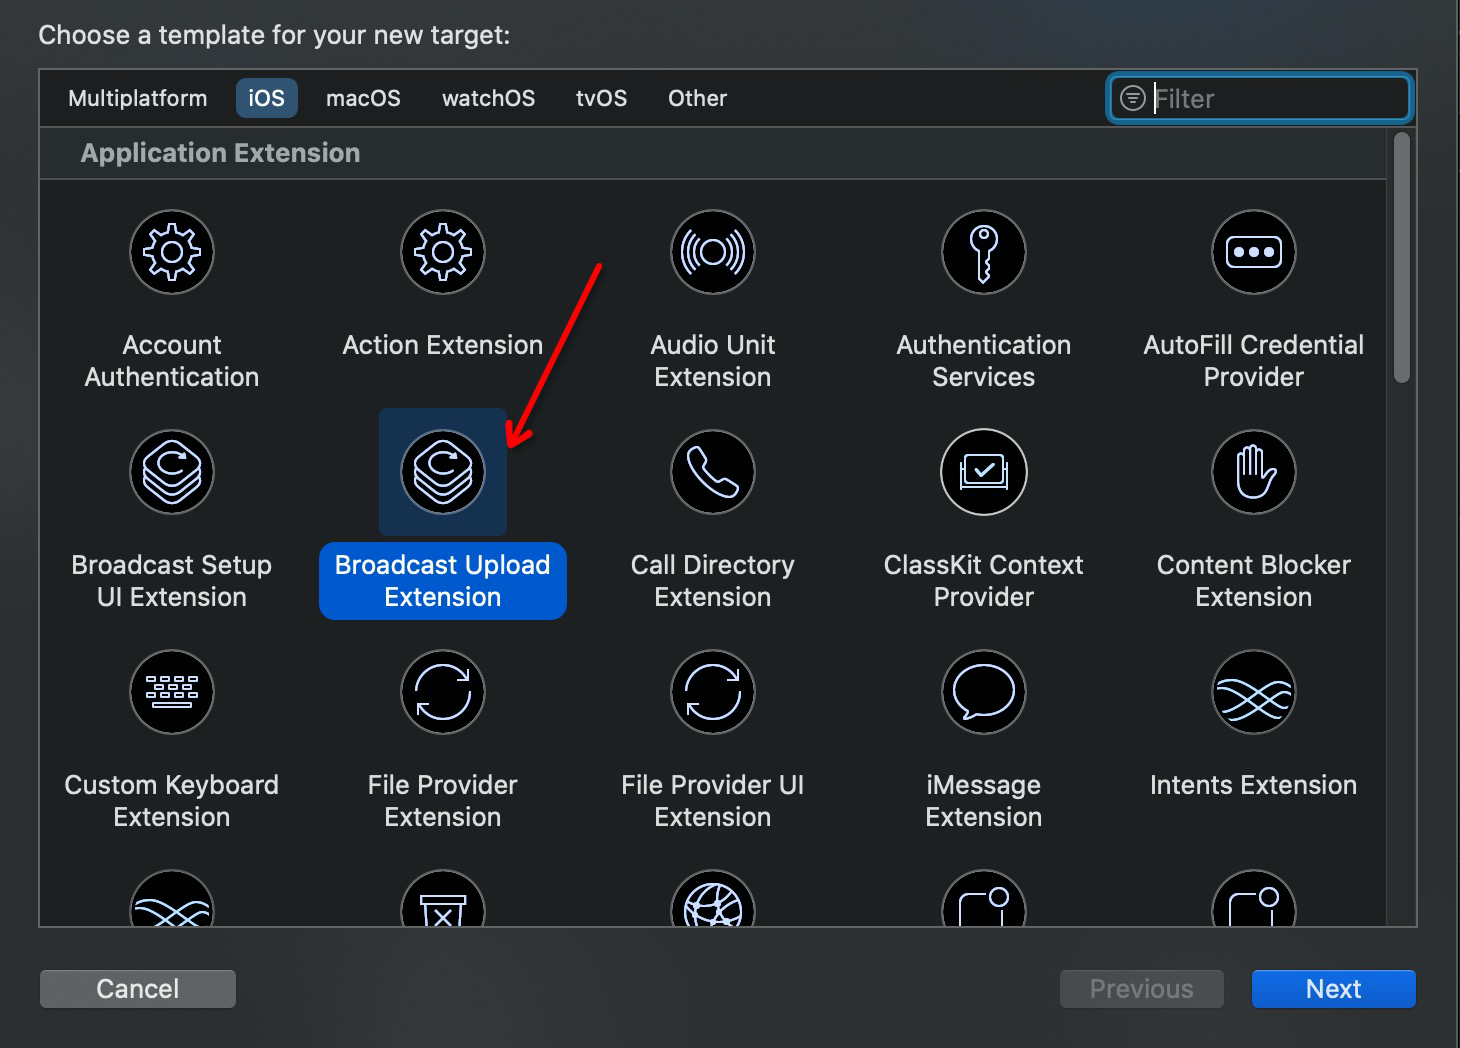
如上所示,在添加 extension 时选中 Broadcast Upload Extension 扩展进行添加。
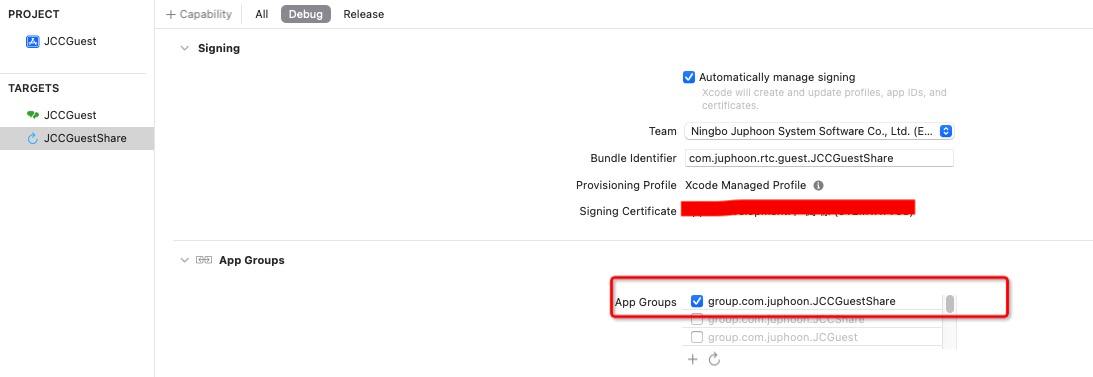
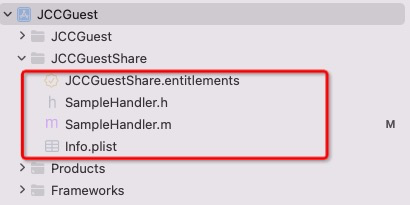
2、app 和 extension 加入同一个 app group 后,实现 extension 和宿主 app 间的数据共享,加入步骤如下图所示。 (opens new window)
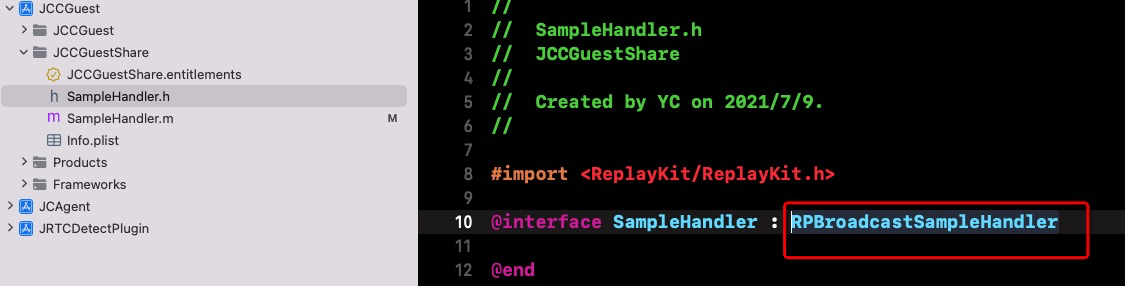
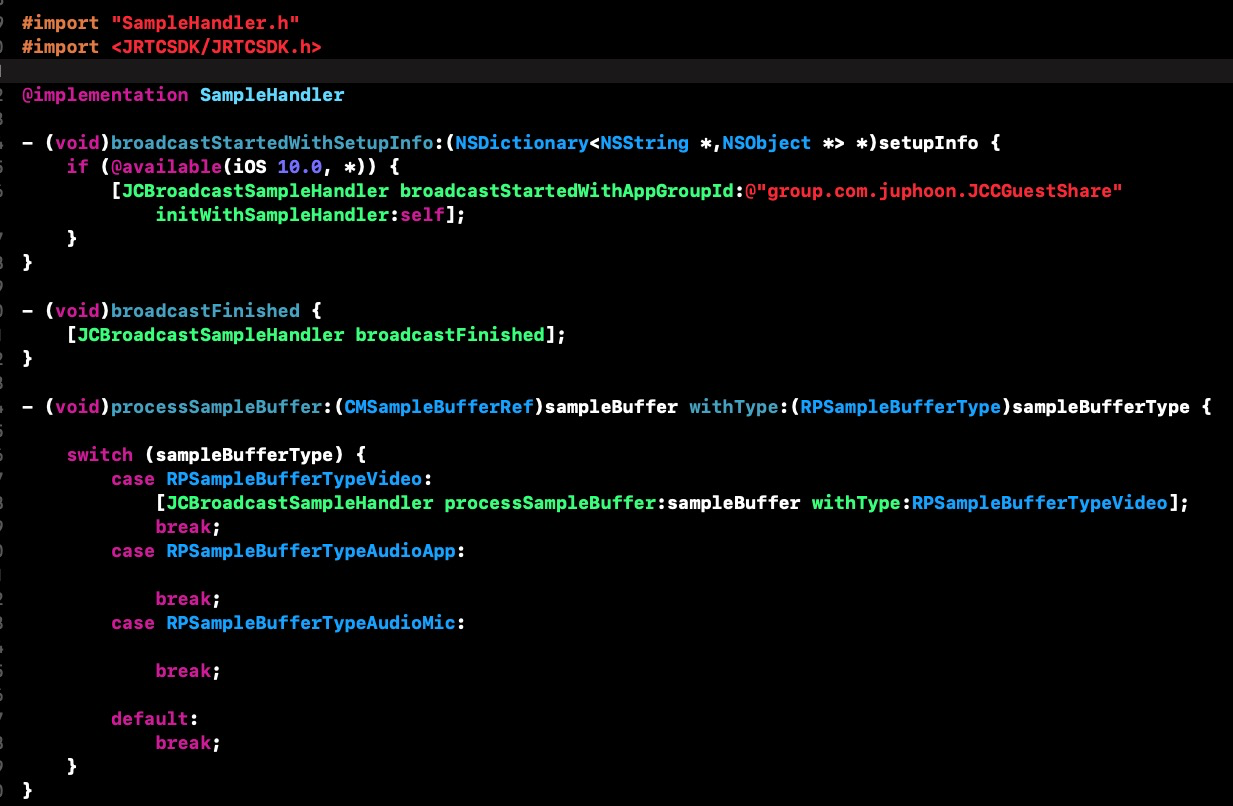
3、然后打开工程目录下对应的 SampleHandler.h 和 SampleHandler.m 文件,导入库 #import <ReplayKit/ReplayKit.h>,继承系统的 RPBroadcastSampleHandler 类,重写broadcastStartedWithSetupInfo、processSampleBuffer、broadcastFinished方法,并且调用调用插件提供的方法,如下图
# 配置屏幕共享参数
在登录的时候传入 shareGroupId 和 shareExtension
- (BOOL)login:(JCCLoginParam *)config {
    config.shareGroupId = @"groupId";
    config.shareExtension = @"shareExtension";
    BOOL ret = [JCCGuestManager.shared login:config];
    return ret;
}
完成以上配置后,即可使用插件屏幕共享功能。
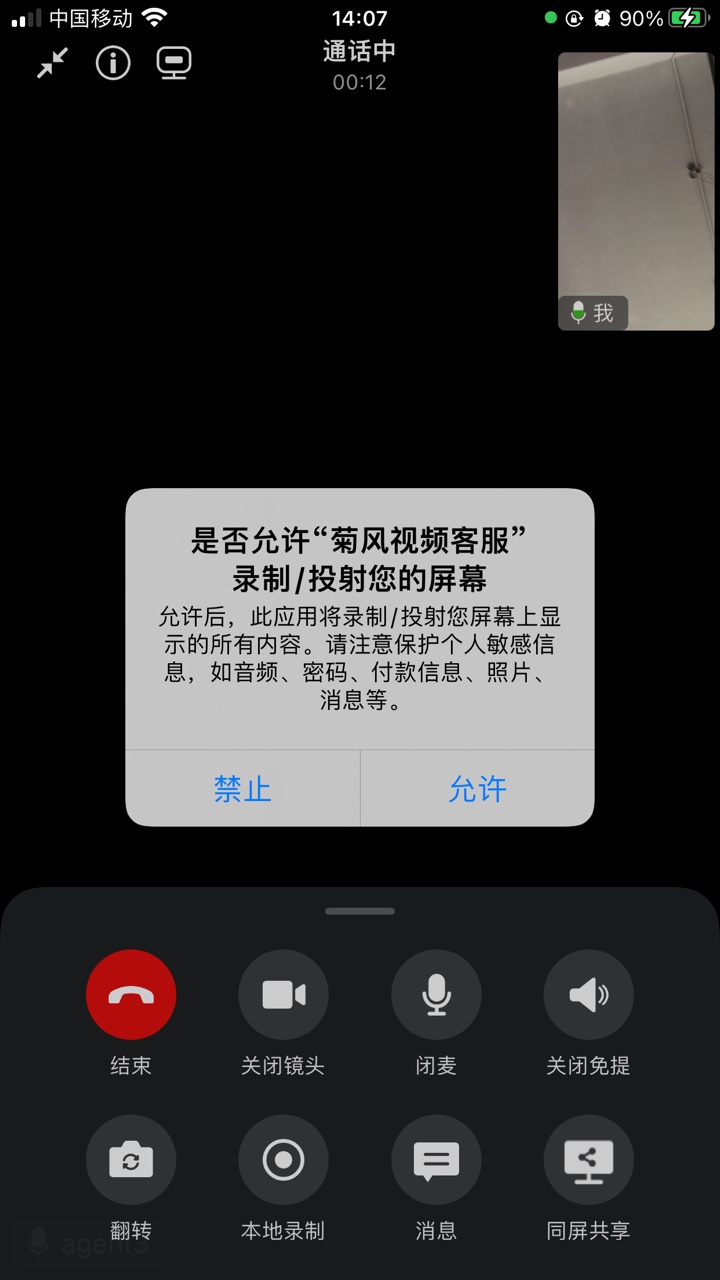
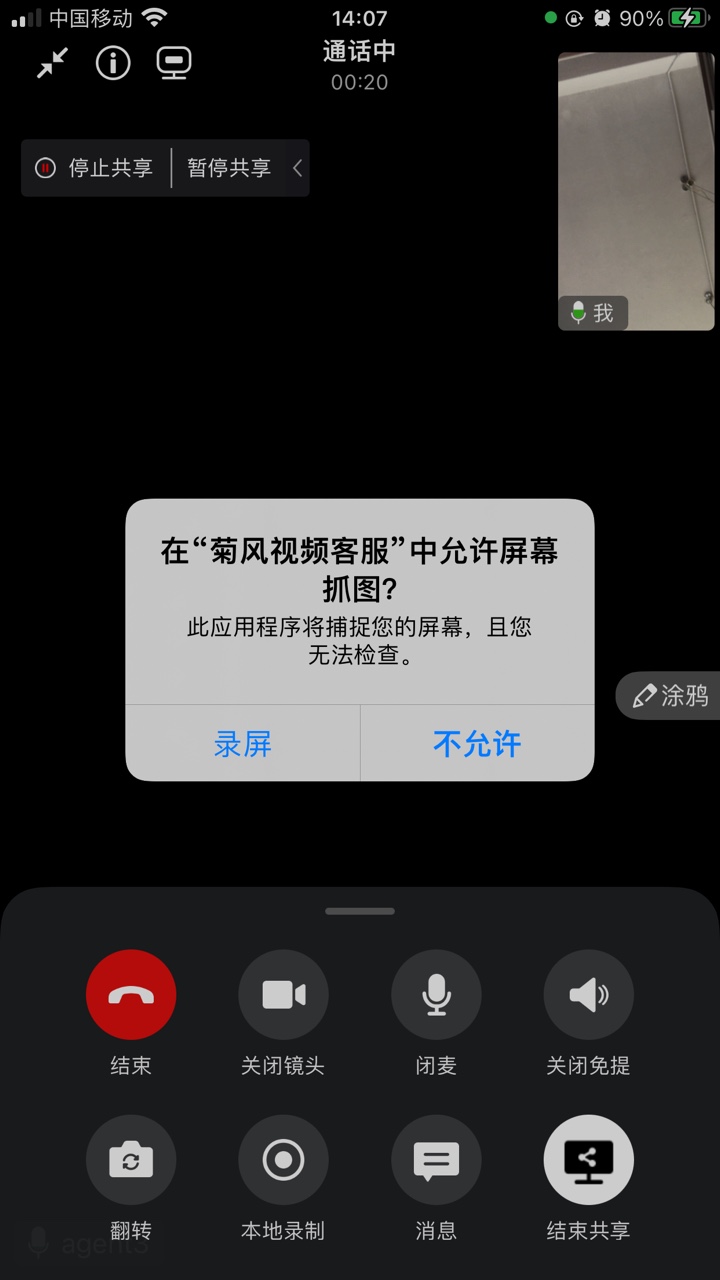
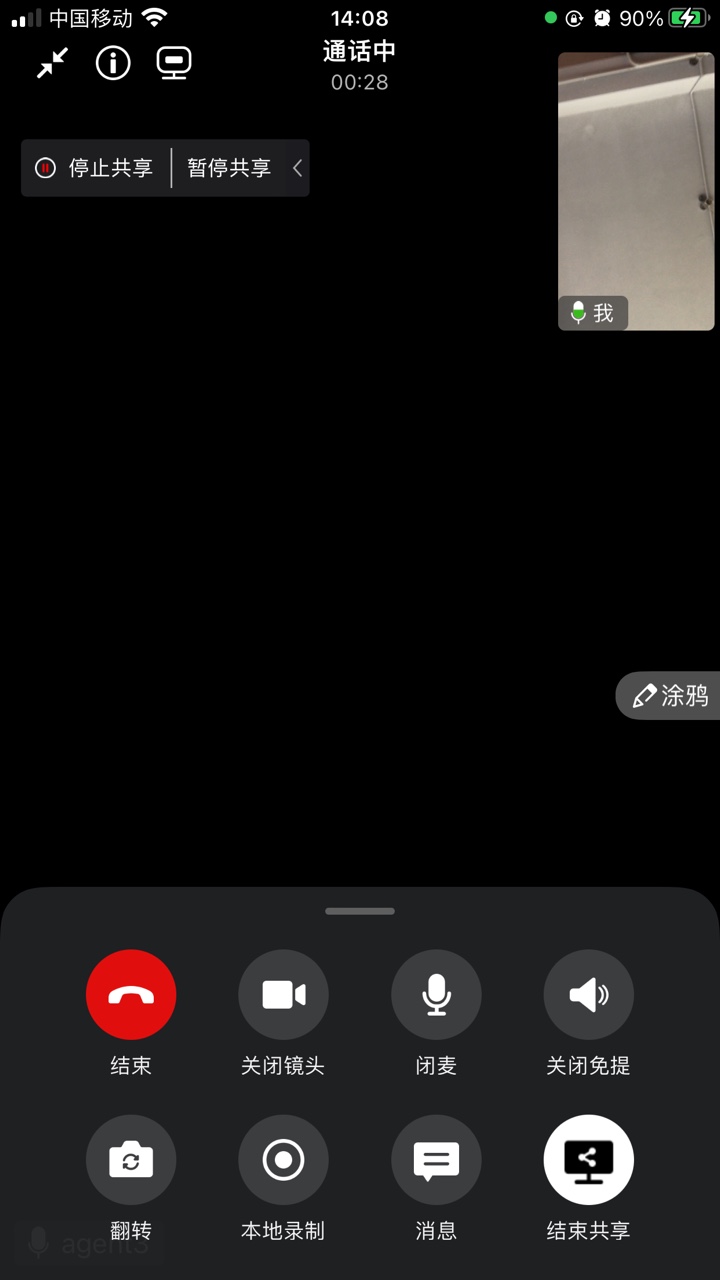
# 9. 同屏共享
# 开启同屏共享
# 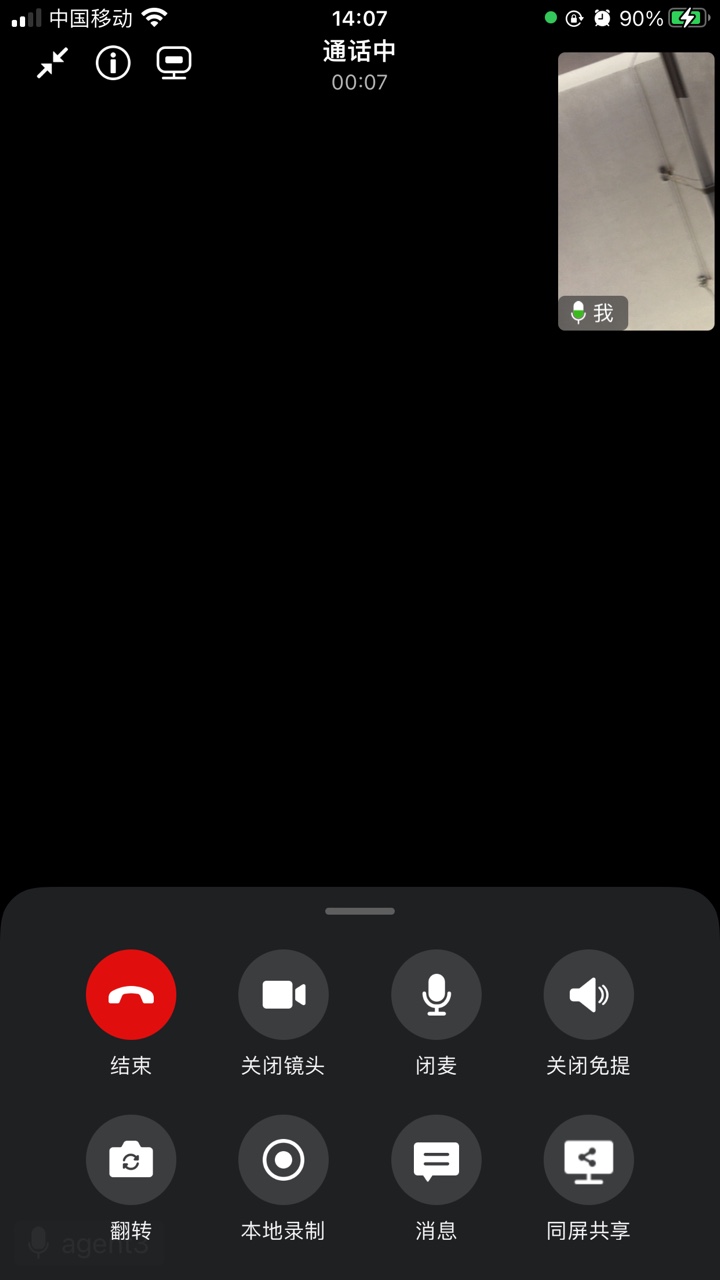
点击工具栏中的同屏共享按钮,在确认框中点击允许,开启同屏共享请求。
# 同屏共享录屏
在远端成员同意请求后,会弹出录屏的请求框,允许录屏后就开始了同屏共享。
# 同屏共享工具
左上方的工具栏可以停止共享或者暂停共享。右边有个涂鸦按钮,点击可以开启涂鸦操作。
# 同屏共享接口调用
暂停恢复共享
/**
 * 暂停/继续屏幕共享
 * @note
 * 只有自己发起的屏幕共享可以使用该接口暂停,多次调用会覆盖
 * @param suspend true 暂停屏幕共享, false 继续屏幕共享
 * @param tip 暂停屏幕共享后提示文字
 * @return 接口调用结果
 * - true: 接口调用成功, 会收到 {@link JRTCKitGuestCallback#onRoomPropertyChanged onRoomPropertyChanged} 回调,可通过{@link #isSuspendScreenShare isSuspendScreenShare} 判断当前屏幕共享是否暂停
 * - false: 接口调用异常
 */
- (bool)suspendScreenShare:(bool)suspend tip:(NSString *_Nonnull)tip;
查询当前是否在共享中
/**
 * 是否共享暂停
 * @return
 * - true: 暂停屏幕共享
 * - false: 未暂停屏幕共享
 */
- (bool)isSuspendScreenShare;
# Token 校验
token 认证服务,主要用于登录时 token 验证,由第三方服务获取 token,将 token 下发给集成的终端,由 SDK 发起登录时带上 token ,进行认证。详见 token 流程介绍 (opens new window)。
允许用户登录时,带入 token 。如果未使用,可以不带。
/**
 * @brief 初始化并登录,登录结果通过 {@link JCCCommonCallback#onLogin:reason: onLogin} 回调通知
 * @param param 初始化和登录的基本配置信息
 * @return 接口调用结果
 * - YES 表示调用成功
 * - NO 表示调用异常
 */
- (BOOL)login:(JCCLoginParam *)param;
示例代码:
JCCLoginParam *loginParam = [JCCLoginParam new];
param.token = @"token字符串";
[JCCGuestManager.shared login:param];