


# Integrate SDK in One Minute
This chapter will introduce how to integrate the SDK into a project you created.
# Prerequisites
Supports macOS 10.10 or above
Effective Juphoon Developer Account (free sign up (opens new window) )
Efficient Juphoon AppKey
# Create a macOS project
Follow the steps below to create a macOS project. If you already have a macOS project, you can directly check the step of integrating JC SDK.
Open Xcode and click Create a new Xcode project.
Select the project type as Cocoa App and click Next.
Enter the project information, such as project name, development team information, organization name and language, and click Next.
TIP
If you have not added the information of development team, click [Xcode] -> Preferences… -> Accounts, click the plus sign in the lower left corner and follow the on-screen prompts to log in your Apple ID. After that, you can choose your account as the development team.
Select the project storage path and click Create.
Go to the TARGETS\Project Name\Signing & Capabilities menu and check Automatically manage signing.
# Integrate SDK
The dynamic library used on the mac integrates SDK.
Unpack and open the downloaded JC SDK dynamic library, including the JCSDKOC.framework file in the sdk file directory.
Copy the
sdkfolder to the directory where your project is located.Import SDK
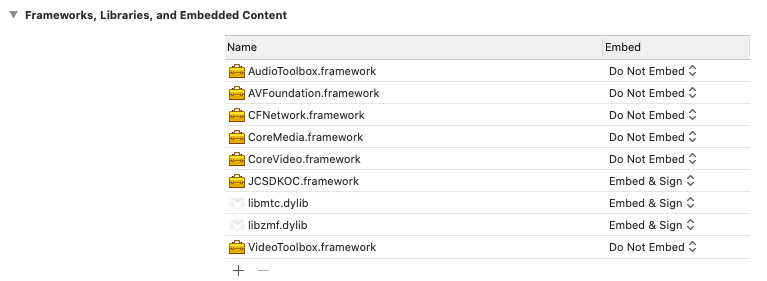
Click ‘General’ and the ‘+’ symbol in the “Embedded Binaries” column, then import JCSDKOC.framework under the JCSDK folder.
Import SDK dependency library
Continue to click the ‘+’ symbol to import the following system dependency libraries:
AudioToolbox.framework
VideoToolBox.framework
AVFoundation.framework
CFNetwork.framework
CoreMedia.framework
CoreVideo.framework
The effect after importing is as follows:
Set path
Click ‘Build Settings’, find Search Paths, set Framework Search Paths, Header Search Paths (header file path) and Library Search Paths (library file path):
Framework Search Paths:$(PROJECT_DIR)/../sdk
Header Search Paths:$(PROJECT_DIR)/../sdk/include
Library Search Paths:$(PROJECT_DIR)/../sdk/lib/ios
TIP
After completing the first step to import JCSDKOC.framework and two .a files, Xcode will automatically generate the path. If Xcode does not automatically generate the path, the user should manually set the path according to the directory where JCSDKOC.framework, include and lib files are located.
Set Enable Bitcode to NO
Enter Target -> Build Settings -> Enable Bitcode in the project and set this item to NO.
Set the parameters of Other Linker Flags to -ObjC
Click ‘Build Settings’, find Other Linker Flags and add the parameter -ObjC.
Set Preprocessor Macros
Click ‘Build Settings’, find Preprocessor Macros, and enter ZPLATFORM=ZPLATFORM_OSX on the right.
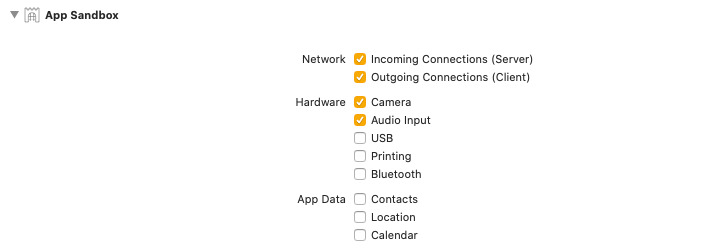
# Add project permissions
Get device permissions
If your project has enabled App Sandbox or Hardened Runtime settings, you need to check the following to obtain the corresponding device permissions:

TIP
According to official Apple requirements:
For software released on the Mac App Store, the App Sandbox setting needs to be enabled. See Apple’s official (opens new window) statement for details.
For software that is not released on the Mac App Store, the Hardened Runtime setting needs to be enabled. See Apple’s official (opens new window) statement for details.
Library Validation in the Hardened Runtime settings will prevent app from loading frameworks, plugins or libraries unless the framework, plugin or library is signed by Apple or the same team ID as the app. When encountering a scenario where the security restriction needs to be removed (for example, it cannot be enumerated to a third-party virtual camera), check Hardened Runtime -> Runtime Exceptions -> Disable Library Validation.
Add the following keys to the info.plist of the project:
Key | Type | Value |
|---|---|---|
Privacy - Microphone Usage Description | String | Use the microphone for purposes like voice call s. |
Privacy - Camera Usage Description | String | Use the camera for purposes like video calls. |