视频数据采集管理
设置要开启的摄像头
视频采集设置前,可以通过 JCMediaDevice 类中的 getCameras 方法获取摄像头列表。
std::list<JCMediaDeviceCamera>* cameras = JCManager::shared()->mediaDevice->getCameras();
摄像头列表获取后,调用 switchCamera 方法切换指定的摄像头。
/// 切换指定摄像头
JCManager::shared()->mediaDevice->switchCamera(cameras[0]);
设置摄像头采集分辨率
调用 setCameraProperty 接口自定义摄像头采集参数,如采集的高度、宽度和帧速率,以实现不同的采集分辨率。
JCManager::shared()->mediaDevice->setCameraProperty(640, 360, 24);
设置 Canvas 旋转角度
调用 rotate 接口设置 Canvas 中画布的旋转角度。其中,旋转角度必须是 90 的倍数,该角度表示与屏幕正方向旋转后的夹角。
JCManager::shared()->mediaDeviceCanvas->rotate(Angle90);
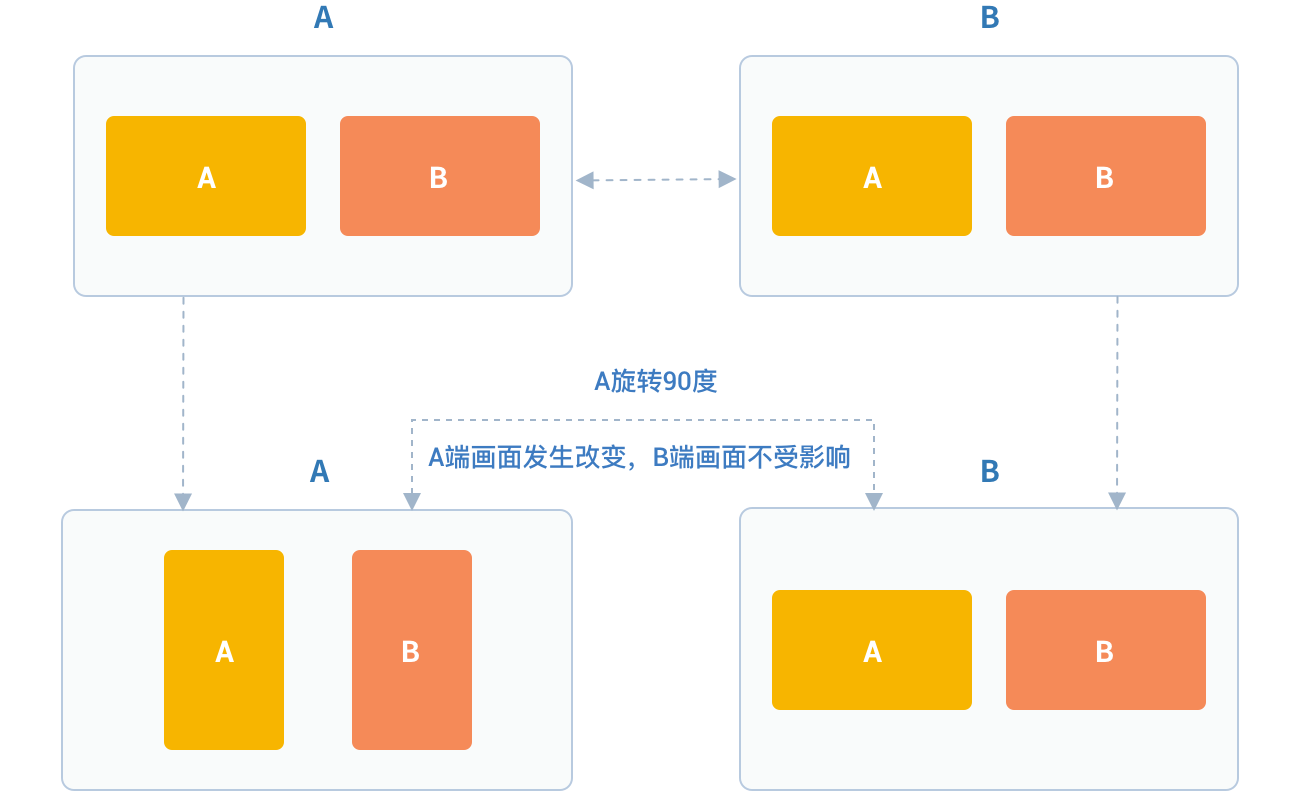
调用该接口后,本端显示的本地视频画面和远端视频画面会同时旋转相同的角度,而对端显示的画面不受影响。
例如 A 设置旋转 90 度,则 A 端显示的 A 和 B 视频画面会同时旋转 90 度。而 B 端的视频画面则不会发生任何改变。如下图所示:

角度值参考下如下
// 窗口与屏幕角度 0
Angle0 = 0,
// 窗口与屏幕角度 90
Angle90 = 90,
// 窗口与屏幕角度 180
Angle180 = 180,
// 窗口与屏幕角度 270
Angle270 = 270
视频数据管理
原始视频数据
在视频传输过程中,可以对每帧视频数据进行图像处理,以实现美颜等需求。有以下两种处理时机:
在视频采集后编码前处理;会影响本地预览和对端接收视频。
在解码后渲染前处理;影响本地接收视频。
具体如下:
视频采集后,编码前处理
参考如下步骤,在你的项目中实现原始视频数据功能:
发起业务前通过 Zmf_VideoCaptureAddCallback 注册视频采集回调,并在该函数中实现一个 ZmfVideoCaptureCallback 类型的回调函数;
成功注册后,JC SDK 会在捕捉到每个视频帧时通过回调函数回调采集到的原始视频数据相对应参数;
用户拿到视频数据后,根据场景需要自行在回调函数中进行参数处理,处理后数据通过该回调函数返回给 JC SDK。
首先注册视频采集回调,在登录成功后即可调用。
/** add capture data callback
 * @param[in] pUser     the callback user data
 * @param[in] pfnCb     the callback
 * returns 0 on succeed, otherwise failed
 */
int Zmf_VideoCaptureAddCallback (void *pUser, ZmfVideoCaptureCallback pfnCb)
回调类型说明:
/** the callback to receive captured image
 * iImgAngle - iCamOrient equal to device rotate angle.
 * if encoder is NULL, the pixel format of buf must be ZmfPixelFormatI420
 *
 * @param[in] pUser     the user data registered by Zmf_VideoCaptureAddCallback
 * @param[in] captureId the id of captured image
 * @param[in] iFace     the capture Face @see ZmfVideoFaceType
 * @param[in] iImgAngle the image rotated angle (CW)
 * @param[in] iCaptureOrient the capturer fixed orient
 * @param[in,out] iWidth  the image width
 * @param[in,out] iHeight the image height
 * @param[in,out] buf     the image data I420 buffer
 * @param[in,out] encoder capture encoder
 */
 typedef void (*ZmfVideoCaptureCallback)(void* pUser, const char* captureId, int iFace,
                                       int iImgAngle, int iCaptureOrient, int* iWidth, int* iHeight,
                                       unsigned char *buf, ZmfVideoCaptureEncoder* encoder);
示例代码
static void zmfVideoCaptureCallback(void* pUser, const char* captureId, int iFace,
                                    int iImgAngle, int iCaptureOrient, int* iWidth, int* iHeight,
                                    unsigned char *buf, ZmfVideoCaptureEncoder* encoder) {

    cout << "视频数据处理" << endl;
}
void JCSampleDlg::OnBnClickedButtonCall()
{
    //注册回调
    Zmf_VideoCaptureAddCallback(void*pUser, zmfVideoCaptureCallback);
    //发起呼叫
    ...
}
注册后,每帧采集的视频数据通过 ZmfVideoCaptureCallback 回调,可以处理对应的视频数据。
如果想移除回调,调用下面的接口。
 /** remove capture data callback
  * @param[in] pUser     the callback user data
  * returns 0 on succeed, otherwise failed
  */
int Zmf_VideoCaptureRemoveCallback (void *pUser)
示例代码
void JCSampleDlg::OnBnClickedButtonEndCall()
{
    //移除回调
    Zmf_VideoCaptureRemoveCallback(p);
    //挂断通话
    ...
}
解码后,渲染前处理
参考如下步骤,在你的项目中实现原始视频数据功能:
发起业务前通过 Zmf_VideoRenderAddCallback 注册视频输出回调,并在该函数中实现一个 ZmfVideoRenderCallback 类型的回调函数
成功注册后,JC SDK 会在捕捉到每个视频帧时通过回调函数回调输出的原始视频数据相对应参数
用户拿到视频数据后,根据场景需要自行在回调函数中进行参数处理,处理后数据通过该回调函数返回给JC SDK。
首先注册视频输出回调,在登录成功后即可调用。
/**
 * add render data callback
 *
 * @param[in] pUser      the callback user data
 * @param[in] pfnCb      the callback
 *
 * @return               0 on succeed, otherwise failed.
 */
int Zmf_VideoRenderAddCallback (void *pUser, ZmfVideoRenderCallback pfnCb);
回调类型说明:
/**
 * The callback to receive video render data
 *
 * @param[in] pUser         the user data registered by Zmf_AddVideoRenderCallback
 * @param[in] renderId      video render unique name
 * @param[in] sourceType    video render source type @see ZmfVideoSourceType
 * @param[in] iAngle the image angle
 * @param[in] iMirror the image mirror type
 * @param[in] iWidth  the image width
 * @param[in] iHeight  the image height
 * @param[in] buf           I420 render data
 *
 * @return                  if process render data should return > 0, other 0
 *
 * @remarks
 *  if buf == 0 or iWidth ==0 or iHeight == 0, means the render will close,
 *  so should call Zmf_OnVideoRenderRequestRemove.
 */
 typedef int  (*ZmfVideoRenderCallback)(void* pUser, const char* renderId, int sourceType, int iAngle,
                                  int iMirror, int* iWidth, int* iHeight, unsigned char *buf,
                                  unsigned long timeStamp);
注册后,每帧解码后的视频数据通过 ZmfVideoRenderCallback 回调,可以处理对应的视频数据。
示例代码
static void zmfVideoRenderCallback(void* pUser, const char* renderId, int sourceType, int iAngle,
                                   int iMirror, int* iWidth, int* iHeight, unsigned char *buf,
                                   unsigned long timeStamp) {

   cout << "视频数据处理" << endl;
}
void JCSampleDlg::OnBnClickedButtonCall()
{
    //注册回调
    Zmf_VideoRenderAddCallback(void*pUser, zmfVideoRenderCallback);
    //发起呼叫
    ...
}
如果想移除回调,调用下面的接口。
/**
 * remove render data callback
 *
 * @param[in] pUser      the callback user data
 * @return               0 on succeed, otherwise failed.
 */
int Zmf_VideoRenderRemoveCallback (void *pUser)
示例代码
void JCSampleDlg::OnBnClickedButtonEndCall()
{
    //移除回调
    Zmf_VideoRenderRemoveCallback(p);
    //挂断通话
    ...
}
自定义视频采集和渲染
对于不支持系统标准 API 的视频采集/渲染设备,或者想利用已经采集好的 I420 或 h264 数据,可另起采集/渲染线程,把采集/渲染数据放入 Juphoon 对应的接口中进行后续操作。
参考如下步骤,在你的项目中实现自定义视频源功能:
通过 JC SDK 提供的接口将外部设备采集/准备渲染的数据输入到 JC SDK 进行后续操作。
如果想停止外部设备采集/准备渲染的数据输入,则调用 JC SDK 提供的接口停止数据输入即可。
自定义视频采集接口如下:
在收到登录成功的回调后以及 Zmf_VideoInitialize 初始化成功后,把采集/准备渲染的数据通过下面的接口输入。
/**
 * The video capture data entry to ZMF
 * iImgAngle - iCamOrient equal to device rotate angle.
 * if encoder is NULL, the pixel format of bufI420 must be ZmfPixelFormatI420
 *
 * @param[in] captureId     unique name of the video capture           //标识外部采集的ID
 * @param[in] iFace         the capture face, @see ZmfVideoFaceType    //外部视频的朝向,一般取0
 * @param[in] iImgAngle     the image rotated angle (CW)               //输入的外部视频正立所需旋转角度,顺时针为正,取值范围0,90,180,270
 * @param[in] iCamAngle     the camera fixed orient                    //外部镜头固定角度,同iImgAngle,取值范围0,90,180,270
 * @param[in,out] iWidth    the image width at least align 4,
 *                          return the cropped width of bufI420.       //输入图像的宽
 * @param[in,out] iHeight   the image height at least align 4.
 *                          return the cropped height of bufI420.      //输入图像的高
 * @param[in] bufI420       the image data                             //输入图像的buffer
 * @param[in,out] encoder   the capture encoder                        //标识输入图像编码格式
 */
 void Zmf_OnVideoCapture(const char *captureId, int iFace, int iImgAngle, int iCamAngle, int *iWidth, int *iHeight, unsigned char *bufI420, ZmfVideoCaptureEncoder* encoder);
示例代码
Zmf_VideoInitialize(NULL);
void JCSampleDlg::OnBnClickedButtonCall()
{
    //输入分辨率为640*360,编码为I420无需额外旋转的图像
    Zmf_OnVideoCapture("Test",0,0,0,640,360,buf,0);
    //发起呼叫
    ...
}
采集停止接口。
/**
 * tell ZMF the video capture has stopped
 *
 * @param[in] captureId     unique name of the device
 */
void Zmf_OnVideoCaptureDidStop(const char *captureId);
示例代码
void JCSampleDlg::OnBnClickedButtonEndCall()
{
    //停止采集
    Zmf_OnVideoCaptureDidStop("Test");
    //挂断通话
    ...
}
如果想在视频渲染端使用自己的渲染方式,则调用下面的接口:
视频数据渲染接口。
/**
 * The video render data entry to ZMF
 *
 * @param[in] renderId      unique name of the video render source                //标识渲染的ID
 * @param[in] sourceType    the render source type, @see ZmfVideoSourceType       //渲染源类型,一般为0
 * @param[in] iAngle        the image rotated angle (CW)ZmfVideoCaptureCallback   //渲染正立所需角度,一般为0 取值范围0,90,180,270
 * @param[in] iMirror       the camera fixed orient                               //渲染镜像类型,一般为0
 * @param[in] iWidth        the image width                                       //渲染图像宽
 * @param[in] iHeight       the image height                                      //渲染图像高
 * @param[in] bufI420       the image data I420 buffer                            //渲染数据buffer
 */
 void Zmf_OnVideoRender(const char *renderId, int sourceType, int iAngle, int iMirror, int *iWidth, int *iHeight, unsigned char *bufI420, unsigned long timeStamp);
示例代码
Zmf_VideoInitialize(NULL);
void JCSampleDlg::OnBnClickedButtonCall()
{
    //输入分辨率为640*360,编码为I420无需额外旋转的图像
    Zmf_OnVideoRender("Test",0,0,0,640,360,buf,0);
    //发起呼叫
    ...
}
渲染数据停止接口。
Zmf_OnVideoRender(const char *renderId, 0, 0, 0, 0, 0, 0, 0);
示例代码
void JCSampleDlg::OnBnClickedButtonEndCall()
{
    //停止渲染
    Zmf_OnVideoRender("Test", 0, 0, 0, 0, 0, 0, 0);
    //挂断通话
    ...
}
视频设备管理
视频设备管理主要用到 JCMediaDevice 类中的方法,具体如下:
开启/关闭摄像头
调用 startCamera 接口开启摄像头。
调用 stopCamera 接口关闭摄像头。
//开启摄像头
JCManager::shared()->mediaDevice->startCamera();
//关闭摄像头
JCManager::shared()->mediaDevice->stopCamera();
获取当前使用的摄像头
调用 getCamera 接口获取当前使用的摄像头。
JCMediaDeviceCamera camera = JCManager::shared()->mediaDevice->getCamera();
获取窗口列表
调用 getWindows 接口获取窗口列表。
std::list<JCMediaDeviceWindow>* windows = JCManager::shared()->mediaDevice->getWindows();
获取桌面列表
调用 getDesktops 接口获取桌面列表。
std::list<JCMediaDeviceWindow>* windows = JCManager::shared()->mediaDevice->getDesktops();
